Authorising a job on Magnetic will help you track scope creep and keep you on track with your budget and estimated time.
Scenario: After tasks are assigned to the job and the time estimate was determined according to the approved cost estimate, more tasks are added and estimated times on tasks are adjusted because the tasks are bigger than expected. Consequently, the tracked time on the job might still be within the total estimated time, but you are way over the initial estimated time and budget that was approved by the client.
To help you manage this, Magnetic allows you to authorise the time on a job. You will then be able to compare the current estimated and tracked time and budget with the authorised time and budget on your job.
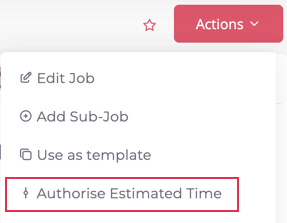
How do you authorise a job?
Only Admins and Owners of the Job will be able to authorise the job. Simply select the "Authorise" icon from the Actions drop-down. You can also remove the authorisation if necessary, just select the "Remove authorisation" icon again.
What happens when you authorise a job?
When the job is authorised, the following fields are saved on all associated tasks:
- Authorised Estimated Time
- Authorised Billing Rate
- Authorised Task Owner
Don't worry, you will still be able to make changes to the associated tasks as well as add tasks to the job.
You can view the authorised amounts in all the relevant reports. Below is an example of the Task Detail Report with columns added for the authorised amounts.

Was this article helpful?
That’s Great!
Thank you for your feedback
Sorry! We couldn't be helpful
Thank you for your feedback
Feedback sent
We appreciate your effort and will try to fix the article