Magnetic has the ability to integrate Pastel Partner Suite v12 and upwards.
Magnetic does not Support Sage Pastel.
Setup:
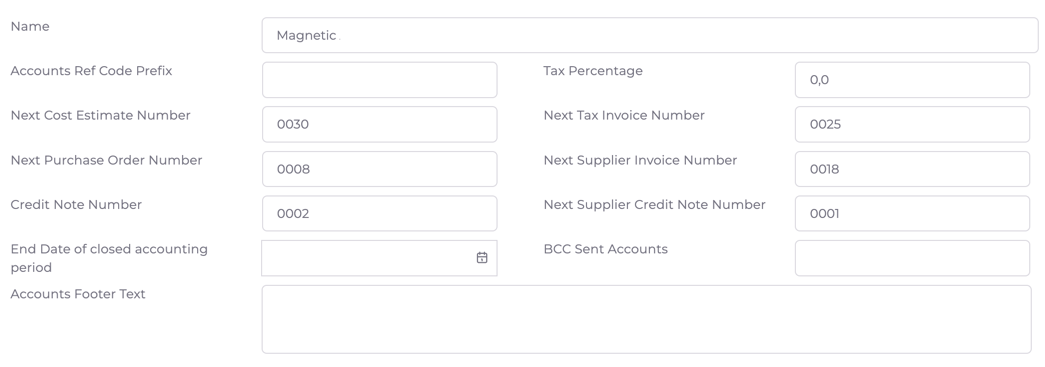
Go to Company setting and click on Finance to have access to the following settings.
- Only Create Account of CE: e.g. Big agencies may only allow creating tax invoices, purchase orders and supplier invoices from a Cost Estimate.
- Only approved customers can be billed:
- Account Ref code Prefix: Add something before the number e.g. Initials of company ( e.g MS4757) or year (20164737)
- Tax percentage: Add the tax percentage for your specific country when you set up your accounts module. E.g. Global default is 14% but UK clients may add 20%.
- Next Account Numbering for cost estimate, Tax Invoice, Purchase Order, Supplier Invoice and Credit note:
- With Pastel, these numbers have to be in sync.
- Customer and Supplier Codes (Affiliate Codes) has to be exactly the same between Magnetic and Pastel.
- Clients can be exported from Pastel along with its Supplier and Customer Codes.
- Pastel codes can then be imported into Magnetic with the Client Import. The Affiliate codes will be entered into the External reference column on the Client Import File.
- Alternatively, all these codes can be entered manually.
- Note: If your financial year differs to the RSA standard financial year i.e. starts March and ends February please notify us during setup (NB before your first export from Magnetic to Pastel).

Integration Settings and setup:
- Accounting Platform: Select Pastel.
- Cost Estimates: Can not be imported or exported. Select "None".
- Purchase orders: Can be exported from Magnetic but not imported in Pastel. You can select export if you wish to.
- Tax & Supplier Invoices and Credit Notes: This must be set to export! This is very important.
- Enable Pastel Version 14 Support: If you use Pastel version 14 and this box is not checked the import will fail because the import is of a different format.
- If you have Pastel version 19 or above, please read the section for "V19" below.


Setting up Item Types:
GL Codes in Pastel must link to the correct Item Types in Magnetic.
- Sales Code: Links to Tax Invoices and Tax Invoice Credit Notes in pastel.
- Cost of Sales Code: Links to Supplier Invoices and Supplier Invoice Credit Notes in pastel.
- Zero Rated Sales Codes: Links to Tax-free Tax Invoices and Tax Invoice Credit Notes in pastel.
- Zero Rated Cost of Sales Codes: Links to Tax-free Supplier Invoices and Supplier Invoice Credit Notes in pastel.
Note: Pastel writes the code with a forward slash. E.g. 2000/01. Magnetic does not use the forward slash in the code for practical reasons to do with importing. In Magnetic that same code will be written as 200001.

Important notes:
- The syncing between Pastel and Magnetic is not automatic. With Pastel, it needs to be synced manually as often as you want to.
- The order of the invoices is important in Pastel. If the order is out of sync then the numbering will also be incorrect.
- Therefore, you must create all invoices in Magnetic (not in Pastel), and import them into Pastel afterwards.
- If the invoice already exists inside Pastel before the import, the invoice will be duplicated during the import from Magnetic.
- Draft Invoices need to be resolved before each import. If there are drafts of invoices during the import, this will also make the numbering incorrect.
- We recommend that you back up your Pastel Account before each import. This is because any mistakes that are imported can not be reversed. However, the backup can be restored if there has been a mistake e.g. Draft invoices were in the import file.
Pastel v19 brings support for two new fields: Objection to Processing and Office 365 Integration. Exports require these two fields to be appended to the end of the current files. However, given that Objection to Processing is a POPIA field, Magnetic is unable to auto-fill this for our customers. As such, Magnetic's Custom Fields now support the addition of Pastel fields, enabling users to set default fields and specific values on their stored companies to handle v19 and possible future versions without issue.
To add Pastel fields for export, follow the steps below:
- Ensure that your Billing Entity is set to Pastel and that you have v14+ compatibility enabled.
- Go to Company Settings->Opportunity/Job/Task->Configure custom fields and show only "Companies" fields.
- Click "New Custom Field" and create a new Heading field with the following settings:
- Label: "Pastel"
- Type: "Heading"
- Active: True'
- Specify your default valu
- For: "Company"
- Using the arrow on the Save button, click "Save and Add New"
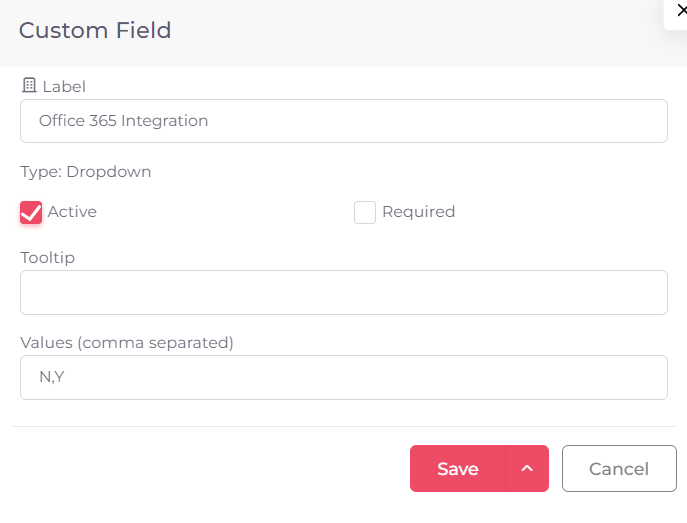
This will create a "Pastel" section in your Company Custom Fields. Any Company Custom Fields in this section will be processed in the Account Export file. We recommend that the type of field used is "Dropdown", as the first value in the "Values" field will be used as the default if it is not filled out. These fields will be added as export columns in the order of progression.
Adding of the fields:


Once you have added your fields, it may look something like this:

In this example, only two columns will be added to the Pastel export: "Objection to Processing" (We recommend the default Y) and "Office 365 Integration" (default N), in that order.
"Free Company Field" is above the Pastel section, and "Medical Contribution" is under a new heading (Company Benefits), so they will not be considered for export.
In this way, you are able to add Pastel's fields in a customisable manner in order to enhance your integration between Magnetic and Pastel.
To export your accounts:
- Click Accounts->Exports
- Click on your billing entity name (where the integration type=Pastel)
- To view what is going to be in your export file:
- Click View
- If you happy, Click "New Tax Invoices Export" to export your file (same process for Credit notes etc)
- All Tax invoices in the exported batch will now be marked as exported.
- If you wish to reset, please click "Reset Last Export". This will mark the invoices you've previously marked as exported to not exported so that you are able to export them again (you would use this if you've made a mistake in your initial export)
You can then go ahead and import the file in your Pastel accounting program. (Please reach out to Pastel directly if you require assistance with importing your data.)
Was this article helpful?
That’s Great!
Thank you for your feedback
Sorry! We couldn't be helpful
Thank you for your feedback
Feedback sent
We appreciate your effort and will try to fix the article
